DIY Halloween luminaries are an easy way to add a spooky glow to your Halloween decor without spending a lot or making a huge mess. With a Cricut, cardstock, vellum, and battery-operated tea lights, you can create glowing Halloween decorations for a mantel, entry table, party setup, or cozy Halloween movie night. They look detailed when finished, but the Cricut does most of the hard work for you.
I originally made these Halloween luminaries with the Cricut Explore Air 2, and it was such a fun seasonal project. The cuts are detailed, the layers make the designs stand out, and the finished luminaries look especially cute when the lights are dim and the little battery candles are glowing inside.
If you enjoy Halloween crafting, this is a nice project because it feels more decorative than a basic paper craft but is still simple enough for a beginner Cricut user.
Updated Note About Cricut Explore Air 2
This project was originally made using the Cricut Explore Air 2, but you can use the same general idea with other compatible Cricut machines. The Cricut Explore Air 2 still works with cardstock and other common craft materials, and the current Cricut Explore Air 2 Quick Start Guide is helpful if you need setup or mat information.
Since Cricut projects and materials can change over time, I always recommend opening Cricut Design Space and following the current prompts for your machine, blade, mat, and material settings before cutting. Cricut also keeps an updated material settings guide that is useful if you are working with cardstock, vellum, glitter paper, or another specialty material.
Why I Love These Halloween Luminaries
There is something about glowing Halloween decor that makes a room feel instantly festive. These luminaries are small enough to use almost anywhere, but they still make a fun statement. I love that they can be made in traditional Halloween colors, or you can switch things up with softer neutrals, metallic paper, or glitter cardstock, depending on your style.
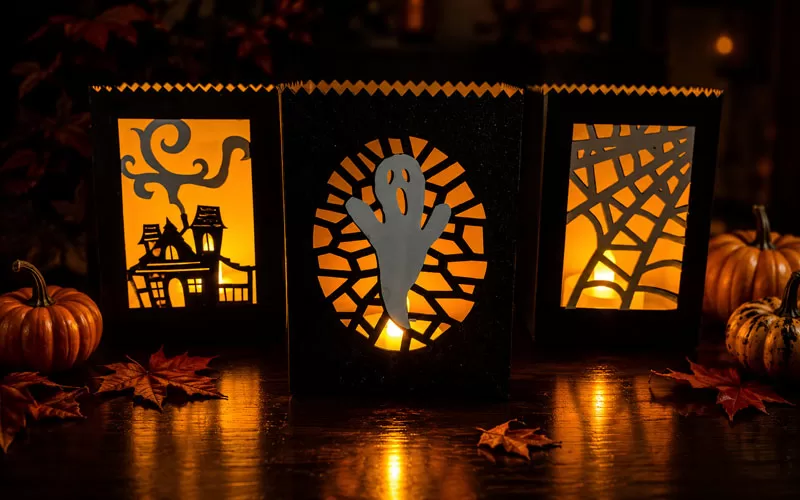
They are also a nice project if you want Halloween decorations that are cute and spooky without being too scary. The little haunted house, ghost, and spider web designs add just enough Halloween charm, especially once the tea lights are turned on.
If you are planning a few seasonal projects, you can pair these luminaries with other Cricut Halloween projects or simple mason jar crafts for inexpensive seasonal decorating.
Supplies Needed for DIY Halloween Luminaries
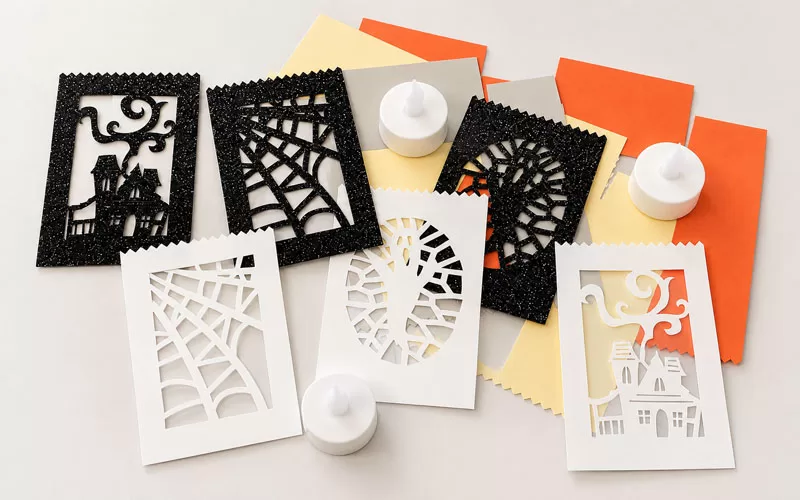
You do not need a huge list of supplies for this project, but choosing the right paper makes a big difference. Cardstock gives the luminaries more structure than regular paper, while vellum helps soften the glow from the lights inside.
For this project, you will need:
- Cricut Explore Air 2 or another compatible Cricut machine
- Cricut cutting mat
- Cricut scoring tool, if your design requires scoring
- Cardstock in Halloween colors
- White cardstock
- Black glitter cardstock or glitter paper
- Vellum
- Adhesive or craft glue
- Scissors
- Battery-operated tea lights
- Halloween luminary design in Cricut Design Space
I recommend using battery-operated tea lights only. These are paper luminaries, so real candles are not safe for this project.
Choosing Your Halloween Luminary Design
The design is what gives these Halloween luminaries their personality. I used Halloween-themed designs with a ghost, haunted house, and spider web look, but there are many ways to customize this project.
You could make them:
- Classic orange and black
- Black, white, and gray for a softer Halloween look
- Purple and green for a witchy theme
- White and silver for a ghostly glow
- Black glitter and vellum for a moodier style
Before you cut everything, open the project in Cricut Design Space and review each mat. This helps you see which color paper goes where and whether the project requires cutting, scoring, or writing. It is much easier to catch a color or material issue before the machine starts cutting.
Tips Before You Start Cutting
A few small steps can make this project go much smoother.
First, make sure your cardstock is firmly attached to the mat. Detailed Halloween cuts can lift if the paper is not secure. A clean mat also helps, especially when using vellum or thinner paper.
Second, double-check your blade before cutting glitter cardstock. Glitter paper can be a little tougher than regular cardstock, so you want a blade that is clean and cuts well.
Third, take your time removing the cut pieces from the mat. Some of the smaller Halloween details can bend or tear if you pull too quickly. I like to gently curl the mat away from the paper instead of yanking the paper straight up.
This is also one of those crafts where it helps to have a little space. I set everything out so I could keep the cut pieces organized by color and design while the Cricut did its work.
How to Make DIY Halloween Luminaries
Once your design is ready in Cricut Design Space, load each mat as prompted and let the Cricut cut the pieces for your luminaries. The machine will guide you through the steps, including when to add a scoring tool or change materials if your design requires it.
After everything is cut, organize the pieces by luminary so assembly is easier. This helps keep the ghost pieces, haunted house pieces, and spider web pieces from getting mixed together.
Step 1: Cut the Luminary Bases
Start by cutting the main luminary bases from cardstock. These pieces form the structure of each luminary, so cardstock works better than thin paper. If the design includes score lines, fold along those lines carefully before gluing.
Step 2: Add the Vellum
Attach vellum to the inside of each luminary where the openings are cut out. The vellum helps diffuse the light from the battery-operated tea light and gives the luminary a softer glow. Use a light amount of adhesive so the vellum stays clean and smooth. Too much glue can wrinkle the vellum or show through once the light is inside.
Step 3: Layer the Halloween Details
Next, add the decorative Halloween pieces to the outside of each luminary. For the haunted house and spider web designs, layer the cardstock and glitter pieces so the details stand out. For the ghost luminary, place the darker background piece first, then add the lighter ghost detail on top. This gives the design more contrast once the luminary is lit.
Step 4: Assemble the Luminary Shape
Fold the luminary into shape and secure the sides with adhesive. Hold the seams for a few seconds so everything stays in place. If your cardstock is thicker, you may need a stronger adhesive or a little extra drying time. Make sure the luminary sits flat before adding the tea light. If it feels uneven, gently adjust the folds until the base is steady.
Step 5: Add Battery-Operated Tea Lights
Place one battery-operated tea light inside each luminary. Turn off a few lights in the room and enjoy the glow. This is the best part of the project because the cutouts really come to life once the light shines through the vellum. The finished luminaries look cute during the day, but they are even better at night.
Where to Display Halloween Luminaries
These DIY Halloween luminaries are easy to move around, which makes them fun to use in different spots around the house. They work especially well in places where you want a little seasonal glow without adding anything too large.
Try placing them:
- On a mantel
- On an entryway table
- Along a buffet or dessert table
- On a bookshelf
- Near a Halloween drink station
- As part of a Halloween movie night setup
- In a covered indoor party area
If you are hosting a Halloween get-together, these would look cute near a themed drink area with something festive like Spooky Vampire Blood Punch or Candy Corn Shooters. The soft glow adds to the Halloween feel without taking over the whole table.
Easy Ways to Customize This Cricut Halloween Craft
One of the reasons I like Cricut projects is that you can make the same design feel completely different just by changing the colors or materials.
For a more classic Halloween look, use orange, black, white, and purple. For something a little more grown-up, try black cardstock with gray vellum or metallic accents. Glitter cardstock also makes the design feel more finished, especially if you are using the luminaries for a party or Halloween display.
You can also resize the design if your project allows it, but make sure the finished luminary is still large enough to safely fit a battery-operated tea light inside. Smaller versions can be adorable, but tiny paper pieces are harder to cut and assemble.
These luminaries also work well on a Halloween party table, entryway console, mantel, or anywhere you want a soft seasonal glow without adding bulky decorations.
Helpful Tips for the Best Results
Use cardstock instead of regular paper if you want your luminaries to stand up well. Regular paper may cut nicely, but it does not always hold its shape once assembled.
Vellum is also worth using because it gives the luminaries a softer, more finished look. Without vellum, you can still see the tea light inside, but the glow is not quite as pretty.
If your design has very detailed cuts, use a clean mat and remove the paper slowly. Intricate Halloween designs can be delicate, especially around spider webs, windows, and small ghost details.
Finally, do not worry if everything is not perfect. Once the luminaries are assembled and lit, small imperfections are much less noticeable. The overall glow and shape are what make them fun.
Frequently Asked Questions About DIY Halloween Luminaries
Can I make these without a Cricut?
You could make a simpler version by hand with cardstock, vellum, scissors, and a craft knife, but the detailed designs are much easier with a Cricut machine.
What kind of paper works best?
Cardstock works best for the base because it gives the luminary structure. Vellum works well behind the cutouts because it softens the light. Glitter cardstock or specialty paper can be used for decorative layers.
Can I use Cricut Explore Air 2 for this project?
Yes, this project was originally made with the Cricut Explore Air 2. Just make sure you follow the current Design Space prompts for your material, mat, and blade settings.
Are these Halloween luminaries beginner-friendly?
Yes. The Cricut handles the detailed cutting, and the assembly is mostly folding, layering, and gluing. A beginner can make them, but it helps to go slowly when removing and assembling the detailed pieces.
Want to save this Halloween craft for later? Pin this DIY Halloween luminaries idea so you can come back to it when you are ready to make a few glowing decorations for the season.
Final Thoughts
These DIY Halloween luminaries are a fun way to make your home feel festive with just a few craft supplies. I love that they look detailed and decorative, but the Cricut makes the process manageable, even if you do not craft all the time.
They are cute during the day, but once the lights are turned down and the battery-operated candles are glowing, they become one of those simple Halloween decorations that instantly adds charm to the room. Whether you place them on a mantel, party table, or entryway, they are an easy Cricut Halloween craft worth making.